Adding Modern Authentication (OAuth 2.0) to MYOB Acumatica Business
Now is the time to upgrade your MYOB Acumatica Business system to a modern authentication service.Microsoft have recently announced that they are ending support for their Basic Authentication services, with the exemption of Simple Mail Transfer Protocol (SMTP) Authentication, on October 1st, 2022. All MYOB Acumatica (formerly MYOB Advanced) sites that still use Basic Authentication in their System Email Accounts will experience connectivity issues after this date.
With MYOB Acumatica version 2020.5.3, support for Modern Authentication (OAuth 2.0) services has become available. We recommend you update your MYOB Acumatica system to the latest version to implement these new services.
To help you avoid connectivity loss and implement a modern email authentication service, we have created a guide to set up a system email along with the exchange integration. The steps below describe a system email account set up for Azure Online. The same approach can be used when setting up an Exchange Online (Office 365) account.
Please note that the procedure below is designed for the most common usage scenarios. If you are implementing a more complicated scenario and encounter difficulties, please contact our support team at acumatica.support@kilimanjaro-consulting.com
How to link a system email account to MYOB Acumatica Business
On the Microsoft Azure Portal, complete steps from the Register an application with the Microsoft Identity platform section. On the Overview page, copy the following values which will be used in the MYOB Acumatica setup:
- Application (client) ID
- Directory (tenant) ID


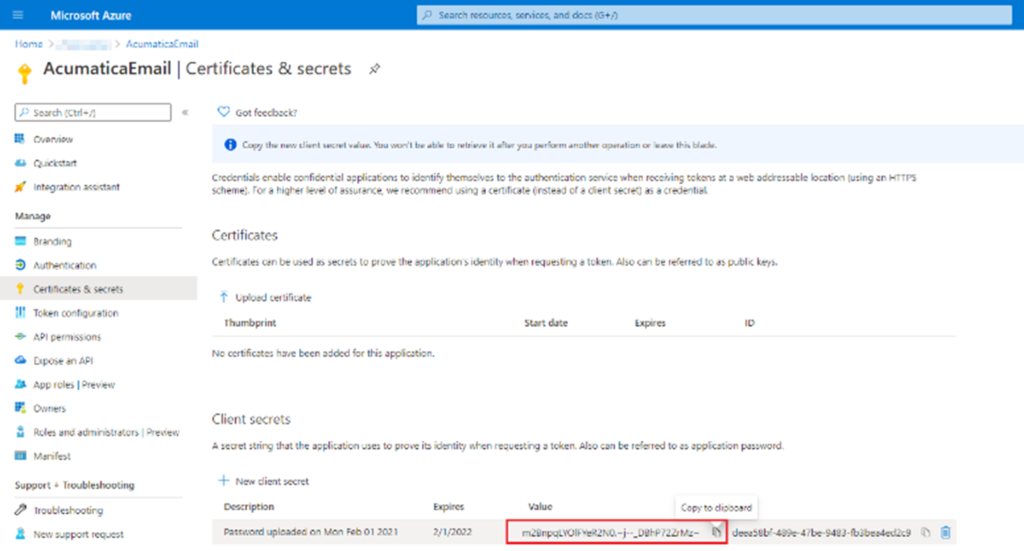
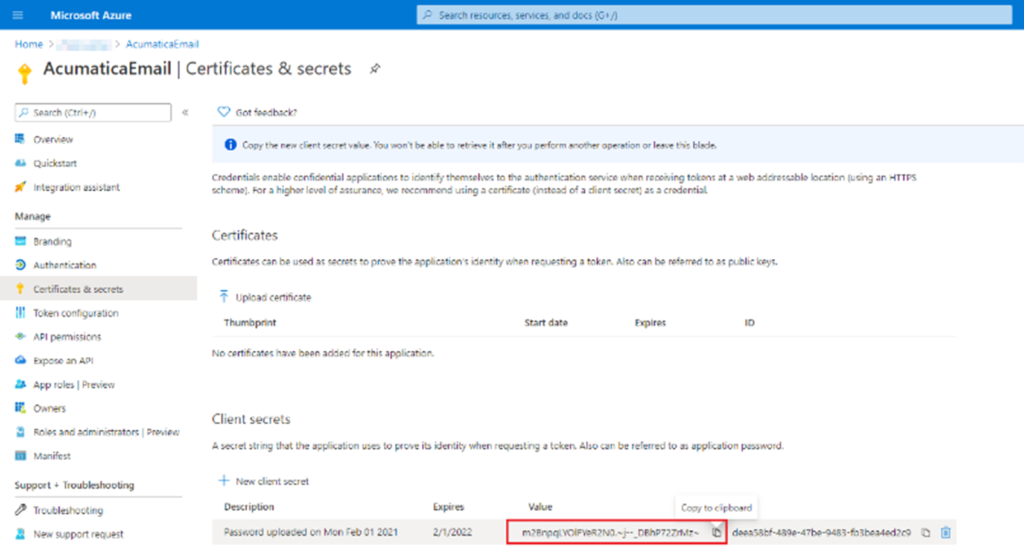
Following this, complete the steps from the Add a client secret for an application section. Copy the client secret value shown. The value will be used in the MYOB Acumatica setup.
In MYOB Acumatica, on the External Applications screen, create a new record by completing the following steps.
- In the Type dropdown, select the Exchange SMTP/IMAP/POP value.
- In the Application Name field, specify the application name.
- In the Client ID field, specify the Application (client) ID value
- In the Client Secret box, specify the Client Secret Value.
- Save your changes

Then copy the value from the Return URL field. This will be used in the next step for the Azure application setup.
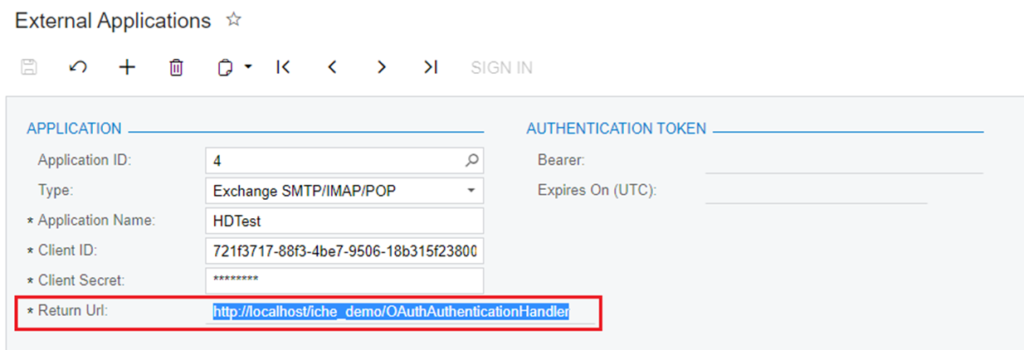
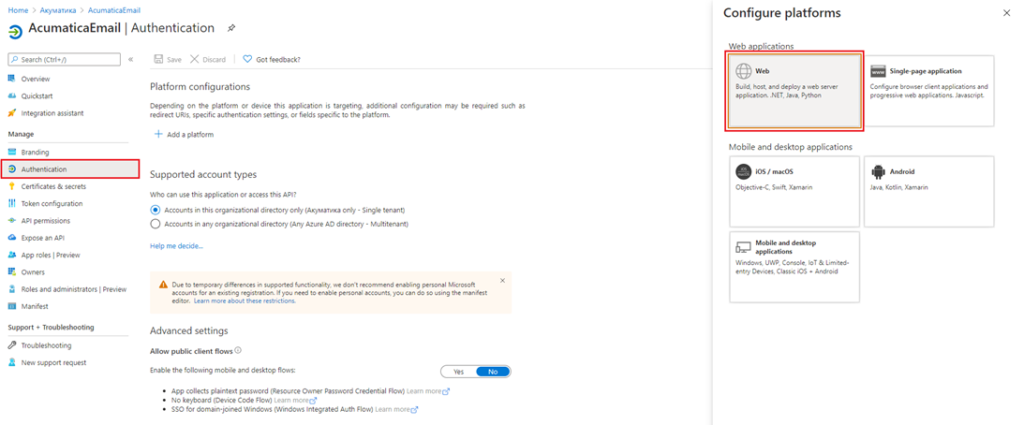
On the Microsoft Azure Portal, complete the steps from the Add a redirect URI section as follows. On the overview page, click the Add a Redirect URI link as shown in the following screenshot.

In the Configure Platforms, select Web as shown in the following screenshot.
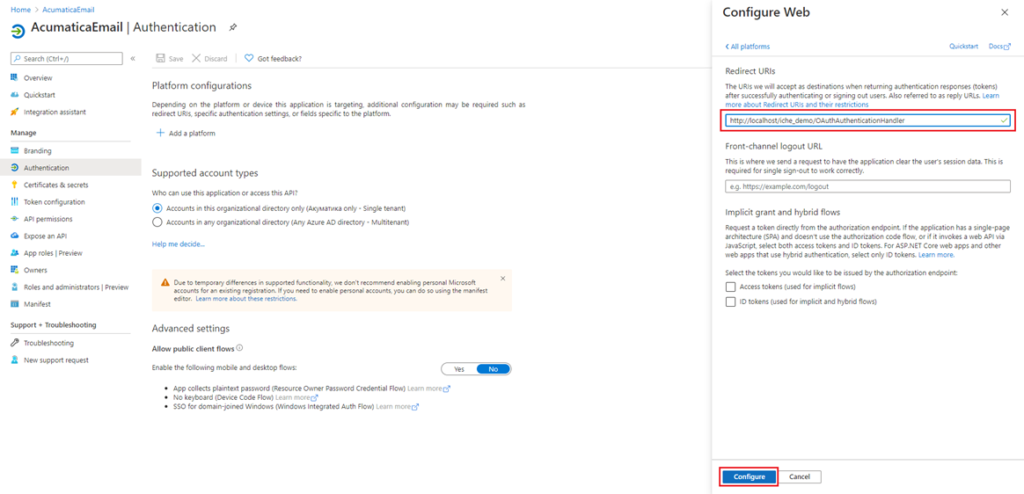
In the Redirect URI box, specify the Return URL box value from MYOB Acumatica. Then click the Configure button.
On the Microsoft Azure Portal, complete the steps from Application permission to Microsoft Graph to grant the needed delegated permissions as follows. Select API Permissions > Add a Permission> Microsoft Graph.

Select Delegated Permissions
Select the following permissions
- Offline_access
- IMAP.AccessAsUser.All
- SMTP.Send
- POP.AccessAsUser.All if needed (however, POP3 is not recommended for use in MYOB Acumatica).
Then click Add Permissions button as shown below in the following screenshot.

Now in MYOB Acumatica, go to the System Email Account screen, then create a new record as follows. On the Servers tab, specify the following values:
- In the Account Name field, specify the account name.
- In the Email Address field, specify the email address.
- Select the Incoming Mail Protocol needed.
- Specify the Root Folder field value.
- Specify the Incoming Email Server and Outgoing Email Server fields’ values
- In the Authentication Method dropdown, select the Azure Modern Authentication option.
- In the Azure Tenant ID field, specify the Directory (tenant) ID value from earlier.
- In the External Application field, select the external application created earlier.
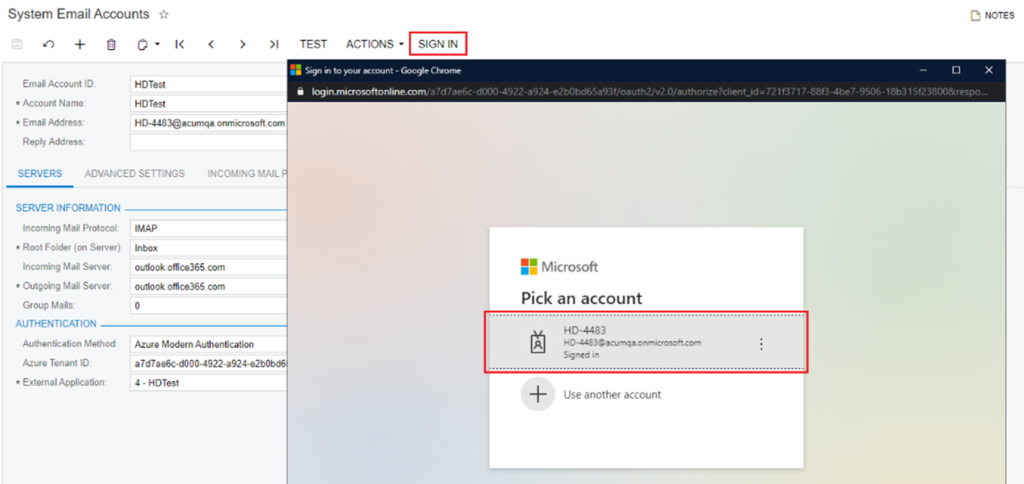
Below is an example of all these fields filled out.

On the Acumatica Settings tab, specify the following values:
- If your server supports the encrypted incoming connection, select the Incoming server requires encrypted connection (SSL) checkbox.
- If your server supports the encrypted outgoing connection, select the TLS option on the Outgoing server encrypted connection.
You can find these fields in the following screenshot. Please save your changes.

Following this, open your Outlook program. Sign into your account. Click the Test button to send a test email to your email account. Verify that the test email was sent to your inbox folder. Now your email account is set up using the modern email authentication service.

How to integrate Microsoft Exchange with MYOB Acumatica Business
The initial setup stages for the Microsoft Exchange Integration are very similar to the system mail setup. From the Microsoft Azure Portal, you will need the following values:
- Application (client) ID
- Directory (tenant) ID
- Client Secret


In MYOB Acumatica, on the External Applications form, create a new record by completing the following:
- In the Type dropdown, select the Exchange Online AWS value.
- In the Application Name field, specify the application name needed.
- In the Client ID field, specify the Application (client) ID value as mentioned earlier.
- In the Client Secret field, specify the client secret value as mentioned earlier.
These fields can be found in the following screenshot. You may now save your changes.

On the Microsoft Azure Portal, complete the steps from Configure for app-only authentication to grant the delegated permissions. On the Exchange Server Configuration screen, do the following:
- In the Account Name field, specify the account name.
- In the Email Address field, specify the email address.
- In the Authentication Method dropdown, select the Azure Modern Authentication option.
- In the Azure Tenant ID field, specify the Directory (tenant) ID value from earleir.
- In the External Application field, select the external application created earlier.
You may find these fields in the following screenshot. Please save your changes.

Click on the Test Server button to test the account settings. The green check box on the form toolbar indicates that the connection is set up. Now your Exchange Integration is using the modern email authentication service in MYOB Acumatica.
The team at Kilimanjaro Consulting are always available to help you through this process. Please contact our MYOB Acumatica support team at acumatica.support@kilimanjaro-consulting.com or give us a call at 1300 857 464 (AU) or 0800 436 774 (NZ) if you need assistance upgrading MYOB Acumatica Business and implementing these email authentication changes.

